Mycelium, straw and weaving

Table of content
Introduction
Making - test 1
Evolution over the weeks - test 1
Making - test 2
Evolution over the weeks - test 2
Making - test 3
Evolution over the weeks - test 3
Caña
Introduction ●
Conor and I wanted to do experimentations with mycelium.
The mycelium is the vegetative part of a mushroom consisting of a mass of branched and filiform hyphae. Fungal colonies composed of mycelium are found in and on the soil and many other substrates. Through the mycelium, a mushroom absorbs nutrients from its environment. Mycelium is essential in ecosystems for its role in the decomposition of plant material. They contribute to the organic fraction of the soil.
It's a very rich material that shows a lot of interest because of the rapid way it develops by feeding on organic matter and due to the mass of branched hyphae that makes it compact.
From this knowledge and experimentation came the idea to grow some mycelium with straw to create a new composite material. Some way to assembly straws can be very strong just by itself. If we were to grow mycelium into those structures, the mycelium will became the «glue» to make this structure even stronger.
On that way, we can easily imagine blocks or sheets of this new material which could be used with Fablab’s machines like laser cutter or CNC milling machine in order to continue to prototype, to try, to fail, to learn and retry by using a more sustainable material that you can easily grow on site and easily compost the rest.
For now, the only stuff developed with mycelium are decorative things like lampshades or soft material to replace the foam for example but not yet in a strong version to build stuff.
Main advantages of this process:
- It could be grow easily by yourself at home, in a workshop or in a non professional laboratory.
- It’s a completely natural process with only two main components : straw and mycelium. You just need a bit of water, coffee grounds or flour to help the mycelium to grow.
- It’s growing faster and don’t need so much space.
- You can easily compost this material after use.
Making - test 1 ●
Preparation
For this fist test, we wanted to see how the mycelium will grow in different type of straw constructions. We prepared 4 petri dishes with rye straw in different forms. We also had some dried coconut fibre and so decided to prepare this for a test also.


Dish 1: Random Straw
First we prepared a dish with scraps of some of the larger diameter sections of straw from our supply, these were placed randomly in the dish to act as a control to compare its strength to the woven and layered straw tests.
Straw diameter: 4.5-5.5mm
Dish 2: Layered Straw
We then prepared a dish with lengths of straw laid side by side, alternating the direction of the rows by 90 degrees each time like the layers of wood in plywood. For this test we used the smaller diameter sections of straw to try and simulate a larger test by raising the straw sections per centimetre.
Straw diameter: 1.5-3mm
Dish 3: Woven Straw
Next we prepared a dish with straw sections woven in an over-under pattern at 90 degrees to one another, again using the smaller diameter straw. We soaked the straw in warm water first as it needed to be flexible to stop it from breaking during weaving.
Straw diameter: 1.78-3.5mm
Dish 4: Straw Husk
We used the smaller and more broken up straw scraps to fill another Petri Dish to see if the already broken straw would react differently with the mycelium than the more lengthy sections used in the other tests.
Dish 5: Coconut Fibre
Finally, we had some dry coconut fibre in the Fablab so we decided to test this as a curiosity. We filled the dish randomly with the coconut fibre as we did with the husk and the "random straw"
Food Box: Beehive style a.k.a “Twisted and tied”
Finally we prepared a test using an ancient technique for making beehives where the straw is twisted tightly before being tied every few CM. Large diameter straw was used.
Straw diameter: 3-5mm
Sterilization
Then, we sterilized everything with the autoclave method :

- Put all the petri dishes (closed with tape) and all the straw you want to sterilize in an autoclave plastic bag and close the bag with autoclave tape (black lines appears on the tape when the autoclave process is finished)
- Put the bag in the autoclave and fill 1/3 of the autoclave with water
- Close the autoclave (make sure it's perfectly closed), lock it and turn on the heat to the maximum
- It takes normally 10-20 min for the red pressure valve goes up (it's like a little button located on the lid of the autoclave)
- Then turn the heat to the middle point and wait 20 min more
- Release the pressure by keeping the valve up with a tweezers and then open the autoclave If there is black lines on the autoclave tape, the sterilization process is done !
Inoculation
The strain we used form the test was an oyster mushroom variety which had been grown from spores on agar in the Biolab at Waag. We used some previously inoculated used coffee grounds which had been growing for around 3 weeks, by which time the petri dish which it was in had been mostly filled with mycelium. We worked around a Bunsen burner in the lab to keep a sterile working environment while we inoculated the straw samples with the mycelium grown on the coffee grounds. We tried to spread the coffee grounds evenly through the straw samples, this was easier in the loosely packed "random" straw than with the tightly packed woven and layered samples. the most difficult to get an even distribution of the mycelium was the 'twisted and tied' sample. the pieces of straw were packed tightly together so getting the mycelium deep into the sample was difficult. If we were to do it again we would have tried inoculating the straw before twisting it together.


At the end, we close every dishes and the foodbox with parafilm and put everything in a foam box (those used by food deliverers to transport frozen products) and we put this box in the boiler room because it's always warm in there.
NB: To inoculate in a sterilized environment we use a gas cylinder and ethanol. We place the gas cylinder in the middle of the table, we light the fire and we spread ethanol all around the gas cylinder within a radius of 40cm. Ethanol evaporates and this creates a sterile area between the table and the fire where you can work.
Evolution over the weeks - test 1 ●
Week 1


The mycelium we had in the lab was not a strong specimen and growth was slower than expected. The samples of the woven (Dish 3) and layered (Dish 2) tests showed the most growth.
Most of the mycelium we used to inoculate the twisted sample (Box 6 - beehive style) fell out while actually twisting and tying the small sample. Thus, there was a limited amount feeding on the straw itself.
The driest samples (Dishes 4 and 5) showed almost no growth.
Week 2


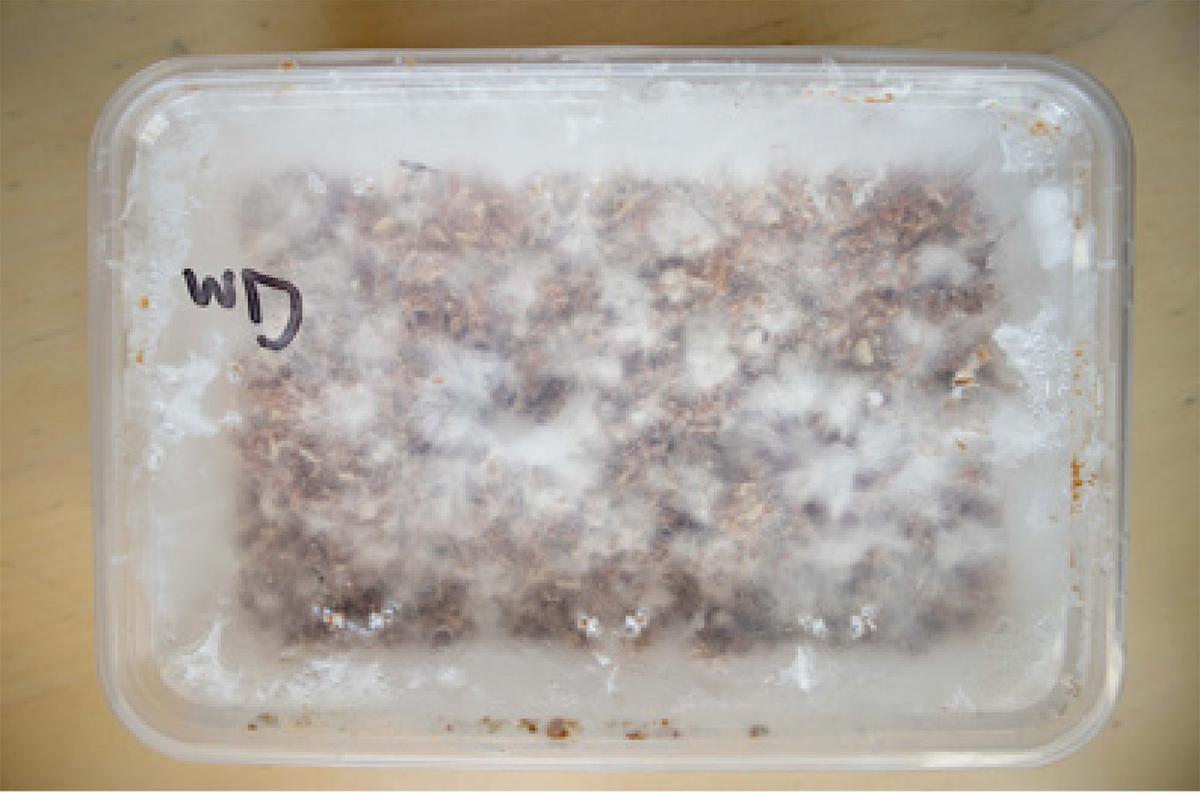
We found some green in Dish 1, the dish is contaminated because there was an hole in the parafilm, we decide to remove this dish from the box.
Dishes 2, 3 and Box 6 look good, the mycelium is growing. And next time, we'll put the twisted straws (beehive style) in a best fit box to force the mycelium to grow on the straw and not around.
The mycelium in Dish 4 and Dish 5 is not growing, the straw is definitely too dry.
Week 3


Dishes 2, 3 and box 6 still growing well but after 3 weeks the mycelium growth is only what would be expected at 1 week.
Dishes 4 and 5 do still not grow, only in the back of the Dish 5 because we reused the petri dish where our mycelium mother grown and so now, the mycelium is growing into the coffee grounds that was left in the petri dish.
Week 4
Laura, an other intern at Waag from Germany, is trying to make mycelium leather following this method from the BioFarmForum.
Because she came back to Germany for one month, she asked us to give some food to her mycelium.

We took this opportunity to put some food in our petri dishes aswell to boost the growth.
The nutrient-rich liquid is composed by :
- Malt extract (3g)
- Yeast extract (3g)
- Peptone (5g)
- Glucose (10g)
- Distilled water (1000L)
and sterilized by autoclaving


The funny fact is, as you can see above, the mycelium is waterproof and the nutrient liquid doesn't go inside the composition. But we figure out this fact by putting the nutrient liquid where there is less mycelium. After this inoculation food giving process, we close the dishes and box with parafilm and reput them into the foam box in the boiler room, like before.


Week 6


Dishes 2, 3 and Box 6 are continued to grow but we don't know if it's due to the food. But the food helped Dish 4 and killed Dish 5. I think we put too much in Dish 5.
Anyway, because we read that 6 weeks is the longest time for this oyster mycelium growing before mushrooms appear, we decided it's time to stop the growing process and dry the mycelium and finally test the resistance of those compositions.


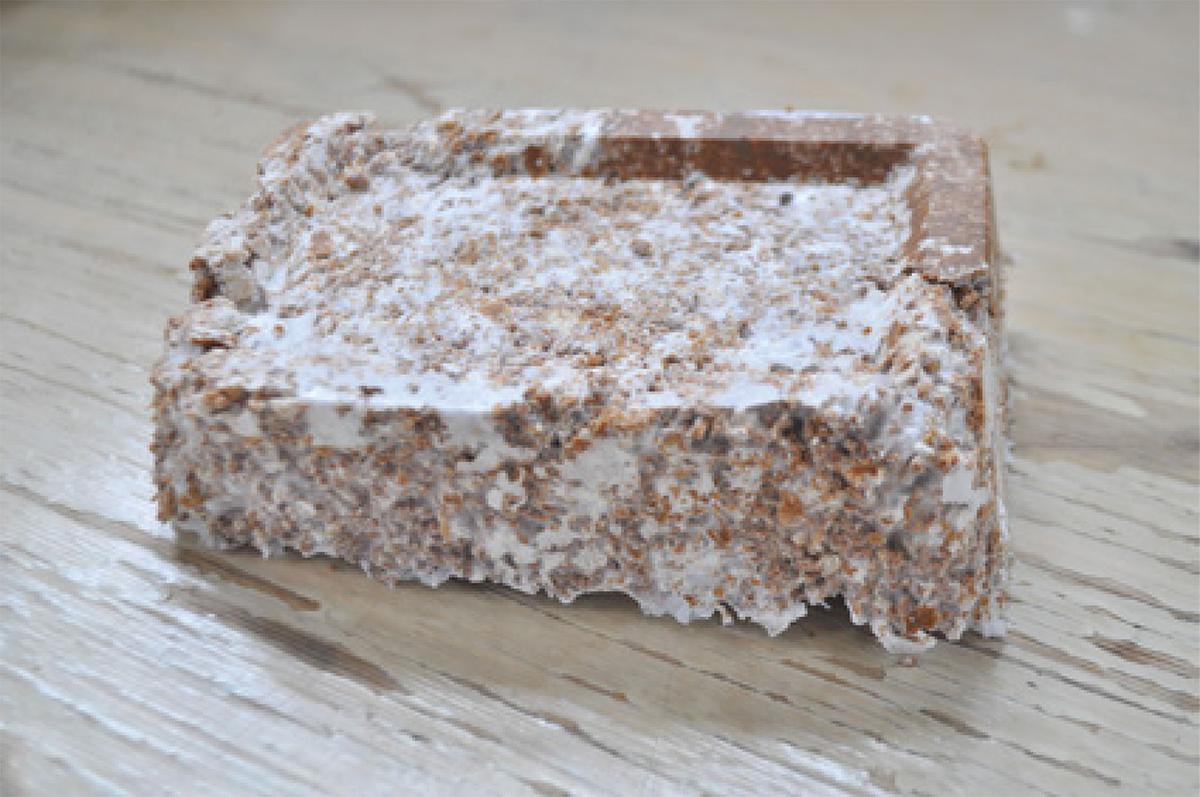
So we put the content of Dish 2, Dish 3, Dish 4 and Box 6 in the oven during 45 min at 200°C.


The result of the Husk straw was so anecdotic to talk about it.
What we learned in this first test
- We need a very strong composition of straw at the beginning to hope have a stronger composition with mycelium. In most of the tests the mycelium grew mostly on the surface of the straw, only adding superficial strength. Only the tiwsted and tied “ skep bee- hive” style test survived handling.
- Mycelium needs a humid environment to grow so it's better to wet the straw before doing the composition.
- try a different way to dry the result to keep it more flexible and less brittle. Maybe by following this method from the BioFarmForum
- time to try something bigger and thicker through the twisted test was by far the best, we will use this sample in a new run of tests with a stronger, faster growing mycelium specimen.
Making - test 2 ●
Preparation:
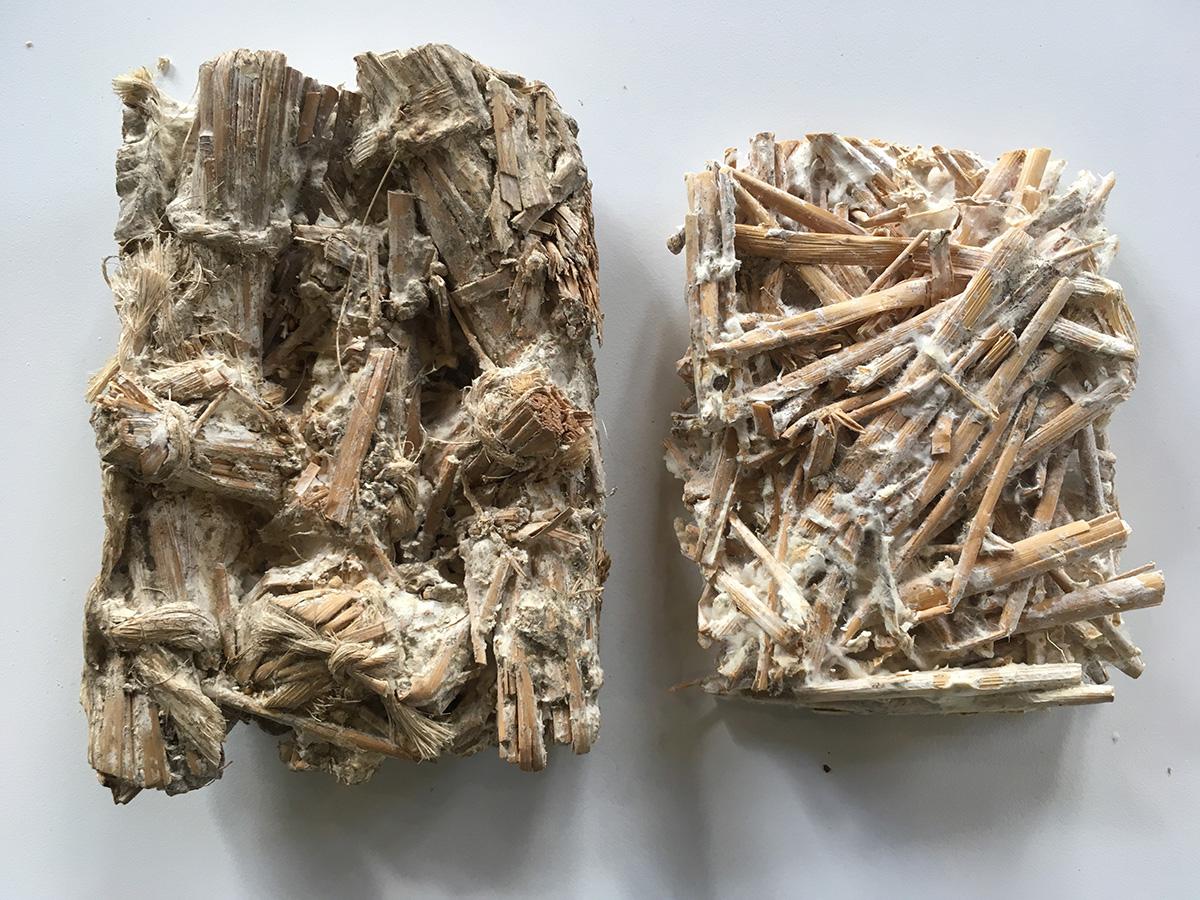
For this second test, we wanted to explore the combination of mycelium and straw in a block form. The clear winner of the last test was the twisted and tied method so we decided to wove those "beehive style stick" together to create a more compact block where every parts held together. And we compared them against randomly arranged straw.
Samples with coffee and flour added were also prepared, these are reported to boost growth by supplying additional nutrients. We also aquired a new grey oyster grain spawn to run this new test.
We first prepared stems of rye straw of ~20cm (because of the size of our boxes and because it fits in the autoclave), we sterilized them by autoclaving, then we added sterilized coffee and flour to some straw package and finally inoculated each package of straw with the millet/mycelium combination.
→ See my previous making post for more information about sterilization by autoclaving and inoculation.
NB : this time we let the autoclave plastic bag open during the process of sterilization to humidify the straw.
And then we prepared different kind of boxes :
- randomly arranged straw boxes (one with coffee, one with flour and one with nothing)
- twisted and tied straw sections woven together boxes (one with coffee, one with flour and one with nothing)
- only wood dust box to see if the longer fibres of straw add any strength at all. (one with coffee, one with flour and one with nothing)


Evolution over the weeks - test 2 ●
Week 1
The level of growth obtained after 1 week with the millet spawn is much better than the previous test.
The woven tests were surrounded by a mix of straw scarps and grain spawn in an attempt to counteract the fact that much of the grain spawn fell out of the twisted samples during preparation, just like in the previous test.
We also made samples of “randomly” ordered straw with coffee, flour and nothing added for comparison to the woven tests. Unfortunately, the boxes with flour and coffee were contaminated with some bad green inside even though we close the boxes with parafilm around the lid and made some holes on the top of the lid closed with pieces of wadding to ensure air renewal while keeping a sterile environment.


Week 2
We stopped the test after week 2.
The leaders in terms of overall mycelium growth were the samples to which wheatflour was added to the straw before inoculating. The woven samples felt stronger than the unordered ones upon initial examination, in support of the hypothesis that strength in the substrate material (twisting and then weaving) is passed on to the resulting mycelium composite. The extra sccraps of straw scattered to fill in the gaps in the woven straw samples seem vital to the end strength, long, woven fibres are not enough by themselves.


All of the test samples were pressed with a book press and then left to grow for another 5 days, in line with the process described by Phillip Ross in his patent for making strong bricks of mycelium material. This pressing is said to add strength and facilitate faster growth.


You can see a test piece using wood dust as a substrate as it appears after pressing. The wood dust test was done as a curiosity but showed decent strength. It could possibly be used to fill in the gaps around the woven straw style samples for more strength.
Next step is to dry them.
Week 3
We dried it in the oven during 45 min at 200°C (like last time.

The result is interesting because it worked like a glue to attached straw together and then it makes the structure stronger but the problem is still that the mycelium when it is dried is very crumbly and so when the structure of straw and mycelium is not strong enough or when there is more mycelium than straw, those parts break too easily.
I think we should try two things:
- grow mycelium and the woven twisted straw in a bag and fill all the holes with little pieces of mycelium, then we gonna have a very compact bag of straw in where mycelium can grow and glue it
- try to soak the composition in glycerine before to dry it, like the mycelium leather process, to make the mycelium less crumbly and more stretchy.
Making - test 3 ●
Let's do a third test in a more compact environment and completely fill with straw. The idea this time is to continue to try the twisted and woven composition of straw but putted in a plastic bag and not in a box anymore. Then, fill the bag with cut straw to avoid holes.
But we first cut pieces of 20cm of straw and sterilize them by autoclaving. We also put the rope we gonna use to twist the straw in the autoclave. When the straw cooled down to a room temperature, we inoculate some mycelium oyster grain spawn on Millet to the straw. We let the mycelium grow like that for few days.
→ See my previous making post for more information about sterilization by autoclaving and inoculation.

After few days, the mycelium grew a bit in the plates.

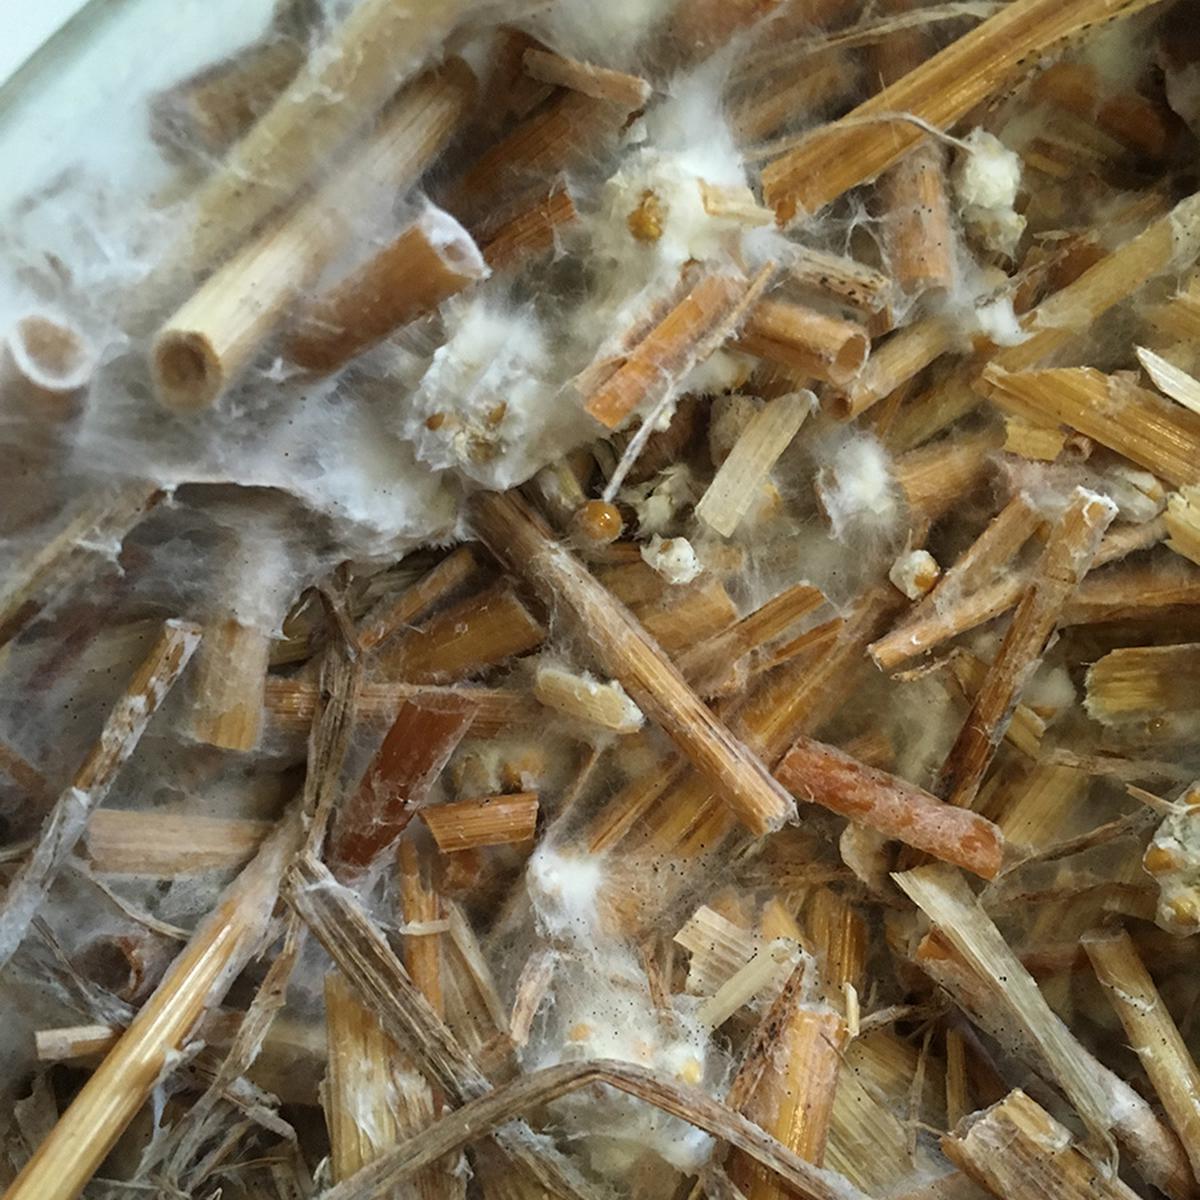
Then we decide to twist and wove the straw.


And we put them in a bag by filling holes with little pieces of straw we also sterilized and inoculated with mycelium in the same time. We made holes all around the bag with a knife to let air comes inside, it is necessary for the mycelium growth. And we roll parafilm around the bag to avoid contamination. Then we put them into the incubator (26°).


Evolution over the weeks - test 3 ●
Week 1


Week 2


Week 3


Week 4


I thought the mycelium grew well inside the structure but when I removed the plastic film, I saw that actually the mycelium grew only around the structure, between the straw and the plastic film and not inside the structure. It could be because I did the structure very compact then there is not enough air inside the structure for the mycelium growth.

So the idea to fill a bag with the structure of straw and plenty of cut straw to avoid holes doesn't work like I did. A better way to do it could be to had an intermediate step between the first inoculation and second
Caña ●
Resources
NUPURI FILMS video in which the bamboo artist Jiro Yonezawa shows how to prepare bamboo for weaving.
XiaoXi's Culinary Idyll videos in which he shows how to make Bamboo weaving baskets from raw bamboo.
both are using a very interesting "split bamboo knife" (竹割包丁/竹割り包丁)
TMDC organised a workshop in Barcelona called Casal d'Estiu - Construcción con caña in which Marta Arnal de Voltes coop shows how to weave caña which is a local "baboo"